
How to Fix a Dropped Stitch

A dropped stitch happens when a ‘live’ stitch slips off the needles during knitting. Since there’s now nothing securing it, the stitch can slip out of the one below, leaving a hole in your knitting. If you don’t do anything about it, the dropped stitch will work its way down and leave a vertical column of holes all the way down to the cast on edge. The good news is that it is really easy to fix a dropped stitch, and you probably won’t have to undo any of your knitting.
I’ve written more below about how to avoid dropped stitches, but for now I’ll assume that you’re here because it’s already happened and you need to fix it right away…
First Things First: Secure the dropped stitch
The first thing you need to do is stop the dropped stitch working its way further down (it’s still fixable if it does, it will just take longer). Use an opening stitch marker, a safety pin, a spare needle or a bit of yarn. Whatever you have to hand that you can put through the stitch to stop it working its way out of the stitch below. Once the stitch is secure, you can pop your knitting down and find a crochet hook or (even better) a stitch fixing tool. If you don’t have either then a spare knitting needle will do the job, but it will be a bit more fiddly.

The method for fixing a dropped stitch is slightly different depending on whether you’re working stockinette stitch or garter stitch fabric, or if you need to pick up stitches at the edge of your knitting.
Fixing a Dropped Stitch in Stockinette Stitch
You will pick up the stitch on the right side of the fabric. Since all stitches are knit stitches on the right side, you will use the same method for each stitch that you have to pick up. Knit until you reach the gap where the stitch should be.

Remove whatever is securing the dropped stitch and insert the hook into the stitch from front to back.

Pick up the ladder directly above the stitch with the hook in (this would have formed the stitch above) and pull it through from back to front.

Keeping the hook in the new stitch, repeat the previous step, working you way up the column of dropped stitches until you reach the top. Take care here - the ladders can become quite stretched out and it’s easy to pick them up up in the wrong order.

Place the last stitch on to the left-hand needle, with the right leg of the stitch to the front.
Continue to knit to the end of the row.
Fixing a Dropped Stitch in Garter Stitch
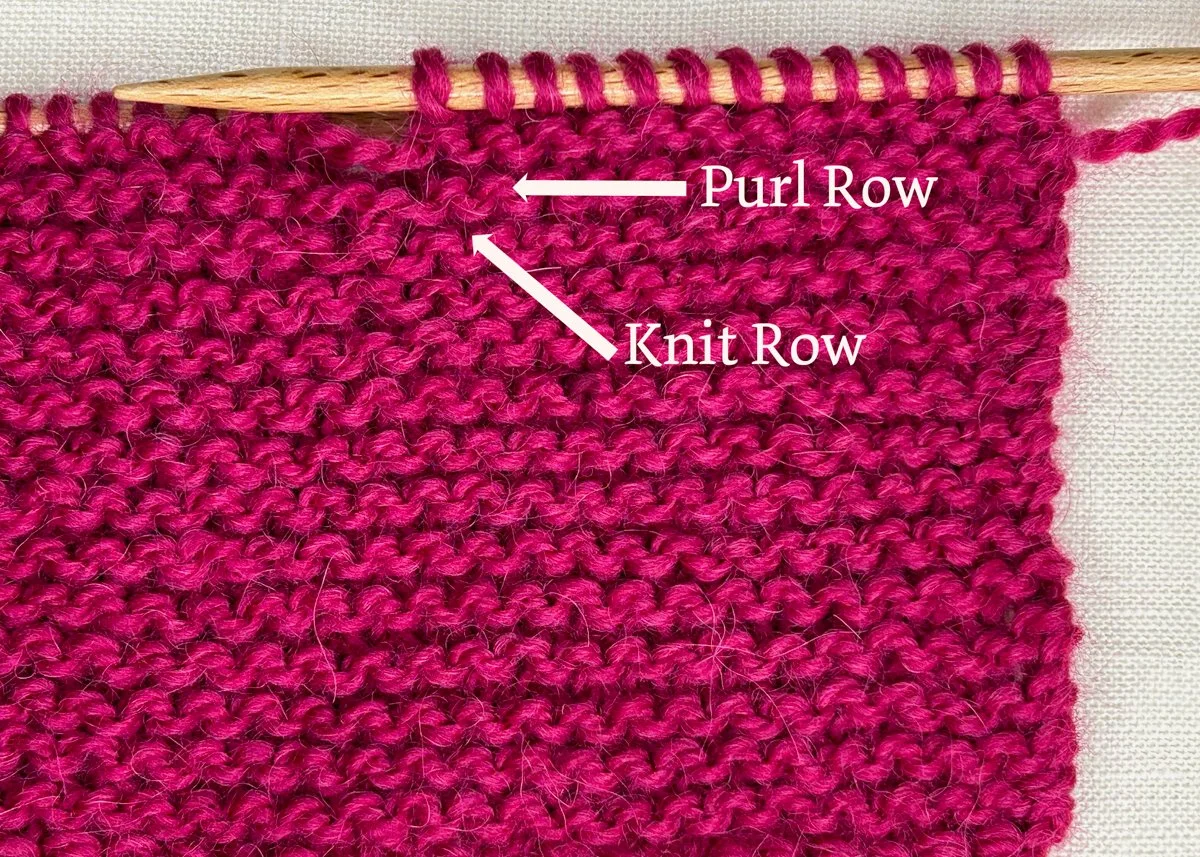
If you’re working in garter stitch then you will pick up all your stitches from one side of the fabric. Since the fabric is reversible and stitches are alternately knit and purl stitches on either side you will need to first determine which one the stitch that you have secured is. Purl rows (knit on the wrong side) stand out as a line of purl bumps. Knit rows are between purl rows, they appear set back and look like a line of v’s.
Knit to the gap where your dropped stitch should be and look at the stitch that you have secured. If it has a ‘v’ shape it is a knit stitch and the next one you pick up will be a purl. If the stitch that you have secured has a purl bump then it is a purl stitch and the next one you pick up will be a knit stitch.

To pick up a knit stitch: Insert the hook into the stitch from front to back and pull the ladder above through the stitch from back to front.

To pick up a purl stitch: put the hook to the back of the fabric and insert it into the stitch from back to front. Pick up the ladder above and pull it through the stitch from front to back. Alternatively, turn the work over and pick the stitch up as a knit stitch on the other side.

Continue to pick up alternate knit and purl stitches until you reach the top, then place the last stitch onto your left hand needle. Take care here - the ladders can become quite stretched out and it’s easy to pick them up up in the wrong order.
Fixing a Dropped Stitch at the Edge of Your Knitting
Dropped stitches at either edge of your knitting will look slightly different to those in the middle of a row. Rather than a ladder, you will see a series of loops hanging from the edge of the piece. When knitting flat, the stitches at each edge are worked twice - once at the end of a row and then again at the beginning of the next row. This means that each loop you see hanging will need to form two stitches.
Knit or purl to the edge with the dropped stitch and then work from the right side of your knitting.

First you need to organise the loops so that you can see which is the bottom strand, and which is the top.

Starting with the bottom loop, pick up ether a knit or purl stitch as required using the bottom strand of the loop. (see above for instructions on picking up in stockinette and garter stitch).

Use the top strand of the loop to pick up the next stitch.

Continue until you reach the top and place the stitch onto the needle that doesn’t have any stitches on it. Turn the work over and knit or purl the last stitch as necessary to finish the row.
Fixing Several Dropped Stitches

Don’t panic! It’s perfectly possible to pick up more than one dropped stitch. If they’re next to one another just make sure that each stitch is secured, then work from left to right, fixing each column of stitches independently. You might need to pull the ladders to tighten them after each column.
Finishing
Hooray! The stitch that you dropped is picked up and you can continue to knit as you were before. You might notice that the picked up stitches look a little different to the ones on either side - the gauge will be slightly different because the stitches were made in a different way. They will even themselves out as you continue to work with and wear your knitting, and blocking will definitely help them to blend in with the rest of your knitting.

Several stitches were dropped here, but blocking will help to even it out!
When to Rip Back…
If you carried on knitting for a few rows after you dropped the stitch, then there won’t really be enough yarn between stitches to pick up the dropped ones all the way to the top. You could squeeze them in, but it is likely to show on your finished piece. Depending on how far back you dropped the stitch, how tight your knitting is, and where it is on your garment, you may choose to rip back a few rows to where the stitch was first dropped before using one of the above methods to pick up stitches.
How to Avoid Dropped Stitches
Obviously it’s easier if you don’t drop stitches in the first place, so here are some tips for avoiding them altogether:
Always finish your row
When working flat it’s always best to finish your row if you can, then push your work down the needles so that stitches are as far away from the tips as possible.
Use stitch stoppers
Stitch stoppers are really useful for keeping stitches on your needles when you’re not working on your knitting. Especially if it’s in a knitting bag while you’re on the move.
Check stitches as you work them
It’s easy to drop stitches as you’re working them if you’re working quickly or not paying attention to each one. Sometimes I think that I’ve worked a stitch, but I’ve not pulled the yarn through properly. It felt like knitting a stitch but it’s actually just dropped off the needles without me noticing. This will happen less as you knit more, but it’s always worth checking that stitches look right as you knit them.
Count your stitches
Okay, so this won’t stop you dropping a stitch, but it should help you notice it quicker if you have. It’s a good idea to keep count of your stitches as you’re going along. Just make sure every few rows that you have the expected number on your needles. If you have lots of of stitches you could always divide them into sections with stitch markers to make counting easier.


