Common Knitting Mistakes (and How to Fix Them)

Learning something new can be both really challenging and really rewarding. To help you minimise the challenging bits we’ve put together a list of the most common knitting mistakes and how to identify them, as well as how to fix them, and avoid making them in the future.
Contents
Dropped Stitches

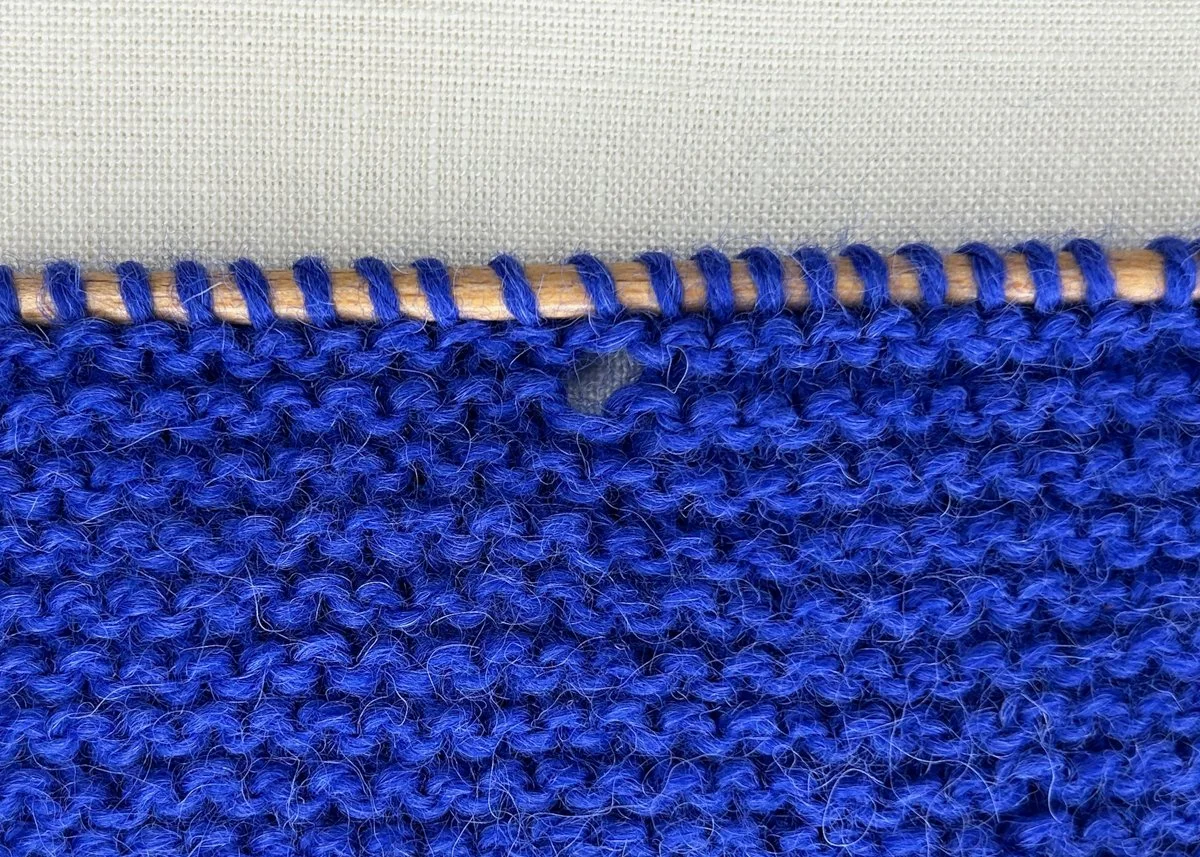
A dropped stitch happens when a live stitch is dropped from the needle. It’s no longer secured, so it can pop out of the stitch below, and then the dropped stitch can work its way down your knitting in a vertical column. You can tell you’ve dropped a stitch because you will see a ‘ladder’ in your work, or your stitch count will be off by one (or more!).
How it happens
It’s easy to drop a stitch as you knit it: if you don’t catch the yarn properly, it won’t get pulled through the stitch below and then that stitch can slip off the needle. Stitches can also get dropped when you’re not knitting, if you move your knitting or place it in a bag, stitches can fall off the ends of the needles.
How to fix
Luckily dropped stitches are really easy to fix, (and they are definitely a problem that doesn’t go away, so it’s worth learning how to fix them early on). See our How to Fix a Dropped Stitch tutorial for the method.
How to avoid
Don’t stop knitting mid row. If you put your knitting down with stitches on each needle then you double the chance of stitches slipping off.
When you do stop, make sure your stitches are pushed as far as possible down your needles. You could also use stitch stoppers to keep them extra secure.
Choose your yarn wisely. Smooth, slippery yarn (think superwash merino) will make it easier to drop a stitch in the first place, and increase the chances of the dropped stitch running down your work. A rustic ‘woolly’ wool will have more friction so stitches are likely to stay in place, even if the needles are removed.
Check your stitches as you go. Keeping an eye on your stitches and making sure they look right as you work them will help to avoid dropping any as you work.
Too Many Stitches & Holes in Your Knitting
There are lots of places where you could pick up extra stitches. Some of them will also result in holes in your knitting.
Accidental YO (Yarn Over)
A yarn over is a way of making an extra stitch with a decorative hole below it, which is often used in lace knitting. It’s worked exactly how you’d imagine - by passing the yarn over the needle between two existing stitches, and it’s really easy to do by accident. To avoid, ensure that your yarn is always at the back of your work on a knit row, and always at the front on a purl row. For ribbing, where you need to switch between knit and purl stitches, make sure you pass the yarn under the tips of your needles, rather than over them.
Double stitch at the end of a row


If you pull the yarn over the needle when you turn at the end of a row, it can make the last stitch look like two stitches. If you then work into both you will have an extra stitch on your needles. Keep an eye out for this at the end of each row and ensure that the yarn is hanging down behind the last stitch for a knit row, and in front of the last stitch for a purl row.
Yarn splitting

If your yarn is prone to splitting then a single stitch can look like two stitches when you come to work it. Look carefully at each stitch as you come to work it to make sure this isn’t happening and try to use yarn that isn’t too prone to splitting when you first start knitting.
How to fix
You’ve got two options when it comes to extra stitches. If you haven’t worked too many rows, then you can knit two stitches together to get back down to the correct stitch count. If you’re worried about the extra stitches showing on your work, or there are obvious holes then you might want to rip back to before you picked up the extra stitch..
Problems With Gauge

Gauge is really tricky, and it's one of those things that really will sort itself out once you’ve been knitting for a while. For now, here are a couple of pointers to speed up the process.
Knitting is too tight
If your knitting is too tight then you will struggle to get your needle into stitches to work them, and risk breaking your yarn. You’ll have trouble moving stitches up you needle, and knitting tightly is also pretty hard on your hands. Try to relax. It’s absolutely natural to hang on to your knitting for dear life when you first start, but it will all get a lot easier if you loosen up.
Knitting is too loose
This is a less common problem for beginners, but loose knitting is less likely to look consistent and it will make it easer for stitches to slide around on (and off) your needles. You could try putting your yarn on the floor while you work, or placing it in a yarn bowl for a bit of extra drag.
Gauge is inconsistent
If you have a mixture of tight and loose stitches then your knitting will just look a bit messy. Practice is the answer here and your knitting will definitely get neater over time. Try to find a hand position that works for you and is comfortable, so that you can always hold your needles in the same way. You could also experiment with different needles - try metal, wooden, bamboo or plastic ones to see which you prefer.
How to fix
As we said before, this one will get better the more you practise. Hang onto old projects so that you can compare them once you’ve been knitting a while and see how much your gauge has improved. If you knitting is really obviously too tight or too loose then you may need to consider starting over, but if it’s not too dramatic then blocking your piece when you’ve finished it will really help to even things out.
Knitting in the Wrong Direction

We’ve all been there. You put your knitting down in the middle of a row, and when you pick it up again you don’t know which way round it should be, or even worse you start knitting in the wrong direction. This is especially easy to do on reversible fabrics like garter stitch, or when working in the round. You’ll know you’ve done it as you will have two extra rows for part of your knitting, and a hole where you turned around.
How to fix
There’s only one way to fix this one. You will need to unpick back to the mistake and knit again in the right direction.
How to avoid
Whenever you start knitting in the middle of a row, the working yarn will be attached to the last stitch that was worked. You need to make sure this stitch is on the right hand needle, so that it doesn’t get worked a second time. You could also get into the habit of placing an opening stitch marker (or progress keeper) into the last stitch you knit whenever you stop to help you keep track.
Stitches Crossing Over Other Stitches

This can occur when you knit a stitch, but don’t pull the loop through the previous stitch properly, and they both end up on the right hand needle, or if you knit into the row below a stitch by accident.
How to fix
Knit across to the crossed over stitch. Slip if off the needle and unravel it. You may need to unravel the one below too. Then pick up the dropped stitches using a crochet hook.
How to avoid
Make sure that you have enough light to see your knitting, and check stitches as you go.
Casting On or Binding Off Too Tight

If you notice that your cast on edge is not as wide as the rest of your fabric, and you have the correct stitch count then you have probably cast on too tight. Likewise if your cast off edge is too tight the fabric will pull in and it will be really easy to spot. Tight edges on a garment can also mean that it is difficult to get on and off.
How to fix
There isn’t really a fix for this other than doing it again. If you notice a cast on edge is too tight, start again right away so you don’t waste time knitting something that you can’t fix. A cast off edge is easier to fix as you only need to redo the cast off, not the whole project.
How to avoid
Make sure that your stitches are really loose when you cast on and off. You could even use a larger needle here. It’s also worth exploring different methods of casting on and off. Having different methods in your toolkit will enable you to select one that is appropriate for your project.
Gripping Too Tight
New knitters often grip their needles really tight. It’s completely understandable - they’re trying to do something quite fiddly without dropping the yarn or the needles. Gripping too tight will hurt your hands though and it can also make your knitting really tight, (and not very enjoyable!)
How to avoid
Try to relax. Make sure that you have somewhere quiet to learn without too many distractions, and try to work over a table if you can so that your needles and yarn won’t fall on the floor if you do drop anything. Make sure that you take regular breaks too - learning something new is really exhausting and your mind (and hands) will thank you for stepping back every so often.
Finished Project Doesn’t Match Your Expectations
It can be so disheartening if you’ve put time and energy into learning a new skill and seeing a project through to completion if it then doesn’t live up to your expectations. This is something that everyone will go through at some point or other, so you’re definitely not alone.
How to fix
Don’t beat yourself up - finishing any project is an achievement, and you probably learned loads along the way. It might feel like you’ve wasted a lot of time now, but you might just need to put the project away for a little while and come back to it when you’re less emotionally involved. On the other hand it might never be right for you, but it could be perfect for someone that you know - can you gift or donate it? If not, why not reclaim the yarn? One of the great things about knitting is that you can (almost) always unpick it and start again. Frog the project that you’re not crazy about and make something that you really love instead.
How to avoid
Swatch! Knitting a swatch before you start a big project can tell you so much about your knitting and your yarn. Making sure that you have a stitch count that is close to what is in the pattern will help to avoid any sizing surprises, and it’s also a great idea to wash your swatch and see what the yarn feels like when washed (and if it grows or shrinks at all).
If you’re using a different yarn to the one suggested in the pattern, try to use one that is similar. Different yarns produce quite varied fabrics, and if you are knitting something that was designed in one yarn then it may look and feel really different in another. yarnsub.com is a really great resource if you’re looking to compare yarn characteristics for a project.
Look at the projects page on Ravelry for the pattern that you’re planning to knit. You’ll normally be able to see the finished project in lots of different sizes and yarns and photographed on a wide variety of body shapes and sizes.
Look for designers that you love. You’ll get to know who writes patterns that you enjoy knitting, and which fit with your personal style. This will take some of the risk out of buying patterns.
Share your progress. The knitting community is a really friendly and supportive place. Share your progress on Instagram or Ravelry, or pop into your local knitting group or yarn store. Knitters will always be happy to talk about your project with you and cheer you on (or offer advice). It might be just what you need to change your perspective on a project that you don’t love.